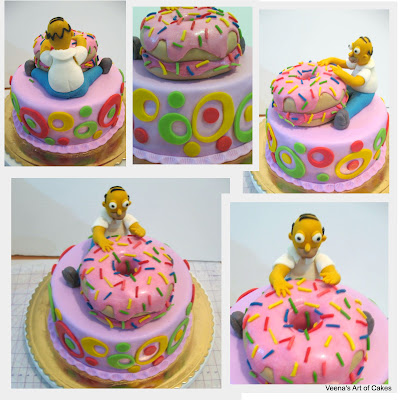
Homer Simpson with his stack of Donuts.
I just made this cake for a big fan of Homer Simpson. While I was very pleased with how the stacked donuts turned out I wasn't very happy with how Homer turned out.
I did take some pictures to show you how I made Homer but since I was so disappointed I dropped the thought of making this post.
Incidently, I was also on the guest list and amazingly when we walked into the restaurant with the cake, everybody was so excited to see Homer! In the very first 5 minutes I had the waitress come to me with guest requests for my business cards. Unfortunately, I had only six cards with me. You can guess what happened next - Homer and his donuts were having a photo seccion.
Anyway, here are a few pictures of my gum paste Homer Simpson in the making. In all I think the body came out quite nice. I think Perhaps,I should have re-done the head. In my defense I was just too tired and mentially exhausted that day to realise it.
Anyway I think the collages are self explanatory. If you still have any questions please feel free to ask me.
1. Making the Pants -
Start with a ball, roll a sausage, start tapering both ends until you reach this shape, fold the two ends in and dig into the pant top to accomodate the belly. Stick two cocktail sticks into the bottom to hold the shoes.2. Making the body -
Start with a large ball, roll into a pear shape, flatten the top of the pear and use your ball tool to indent so the neck will sit secure, taper the bottom a little so it will sit flush into the pants.
3. Making the Arms
Start with two similar size gumpaste balls, roll into a long sausage tappering towards one end, Use your finger to make wrist; then flatten the palms and cut and shape the fingers. Use a semi circle disc of white for the sleaves and just wrap the top of the arm. Use cocktail sicks to secure the arms in place.
4. Making the Shoes -
Make two similar black gumpaste balls, using your finger, indent and roll at the same time to get the above shape. Make the shoe soles with the back of your knife and secure them to the pants with cocktail sticks.
5. Making the Head - I think the head should have been a bit larger and the forehead a tad taller. So if you attempt it - keep that in mind.
Start with a round ball, then roll a sausage, taper the roll to one end makiing a neck.
Next add facial details, two large round ball for the eyes, a small sausage for the nose and
for the mouth shape almost like a beak but flatter. (I hope that makes sense)
Well, I hope you found some of it useful. Let me know if you have any more question.
Until next time, Happy cake decorating,
Veena
If you like this post, please consider subscribing or following my blog.
Veena Azmanov
Unforgettable Cakes for memorable occasions
Regards
Veena Azmanov
Visit this blog - http://veenaartofcakes.blogspot.com/
For more cake decorating tutorials Please visit my
Website - http://www.veenaartofcakes.com/
Find us on Facebook -
https://www.facebook.com/pages/Veenas-Art-of-Cakes/151626264936231
Veena Azmanov
Visit this blog - http://veenaartofcakes.blogspot.com/
For more cake decorating tutorials Please visit my
Website - http://www.veenaartofcakes.com/
Find us on Facebook -
https://www.facebook.com/pages/Veenas-Art-of-Cakes/151626264936231


No comments:
Post a Comment